Search and jump
The find box is located near the bottom of the Scene Control. You could also go there directly using shortcut (default is Ctrl+F).
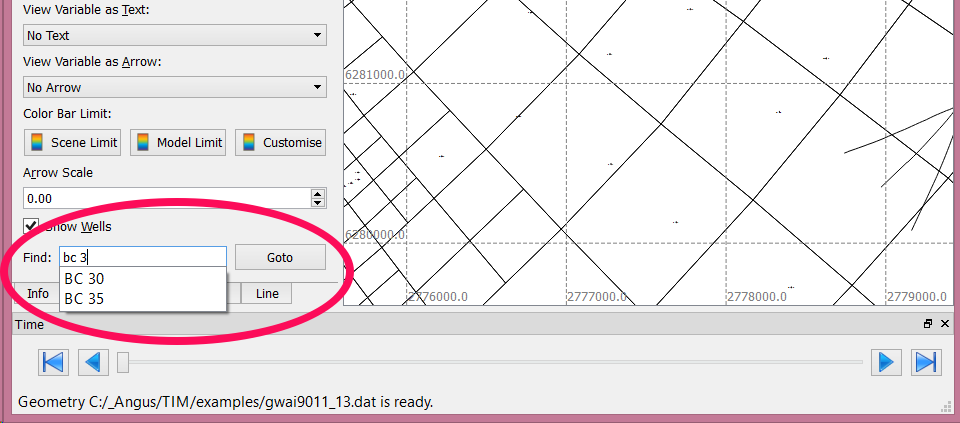
As soon as you start typing a block name, the text-box will start poping out auto-completion. You can nevigate the auto-complete using up and down arrow key. Either you finish typing or decide to use one of the auto-complete, Enter will move the scene so it centre on the block you are looking for.
Tip: At the moment, it may not be obvious that the scene has already centred on the target. Also when the scene is zoomed out (you can see a large portion of scene), the scene might not be able to move due to the scene boundary. This will be improved in the future.
Note that the search box expects name of blocks within the current scene.
If you want to search a well, you prefix the text by w:. This is telling the search box to look for wells instead of blocks. Similar auto-completing will be activated.
Info panel
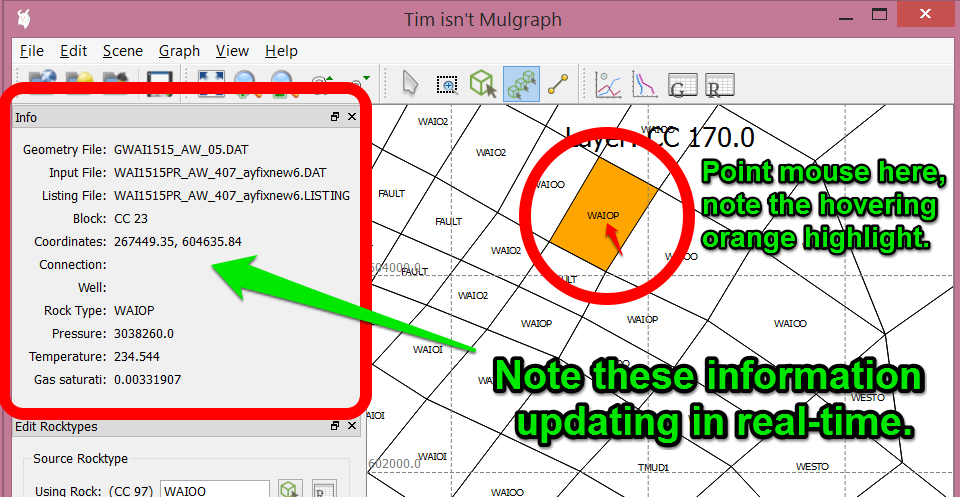
If you have your Info Panel visible (not hidden under the stacked tabs), you should notice how the information updates as your mouse moves in real-time. The scene should also show a orange highlight indicating which block you are hovering above.
Note that the Info Panel can be dragged out to a convinient corner of your screen, just like any other tabbed panels. They can also be docked to a corner of your main window (which is how TIM starts up by default).
TODO: user customisable information entries.
Customise colorbar
... coming soon ...
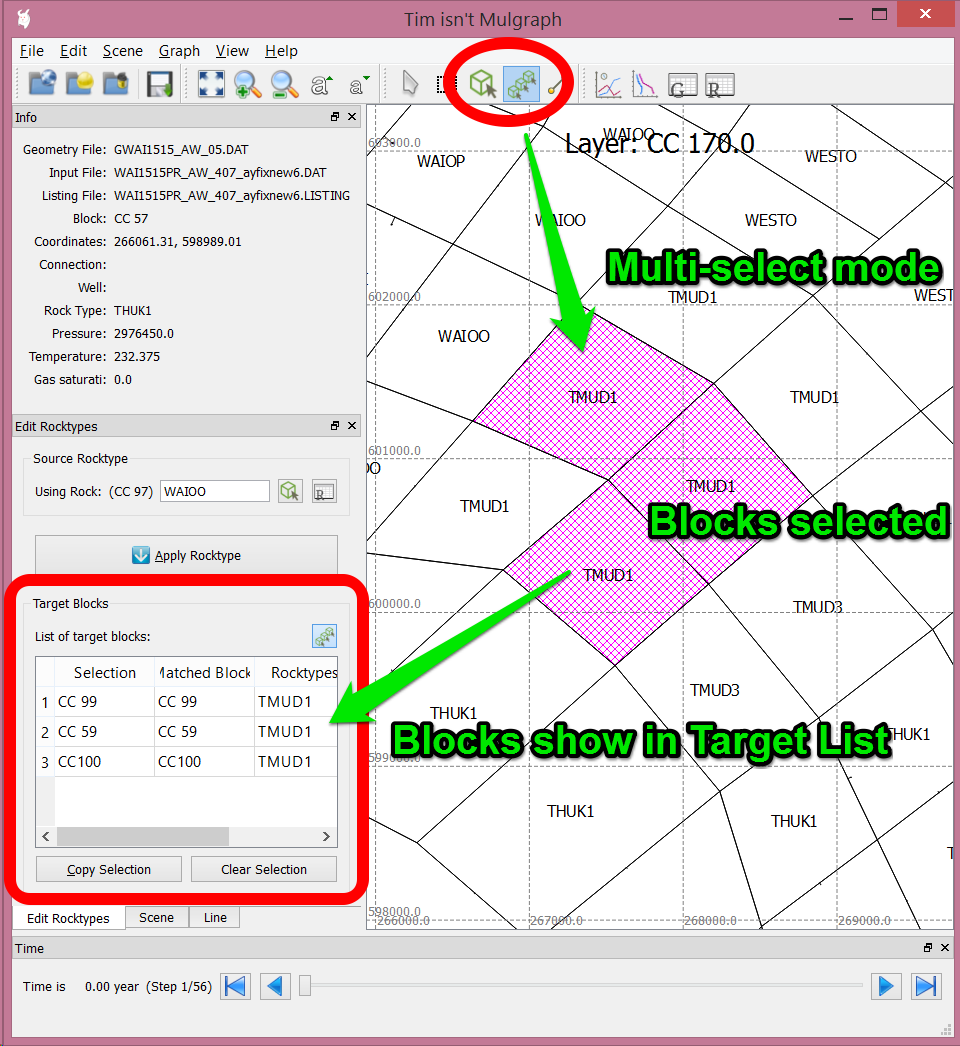
Editing rock types
Editing rock types of blocks uses the idea of copying. You need to select a Source block that contains the desired rock type.

Then you select blocks that you want to apply the rock type to. Click blocks to select, and click again on selected block will remove it from selection.
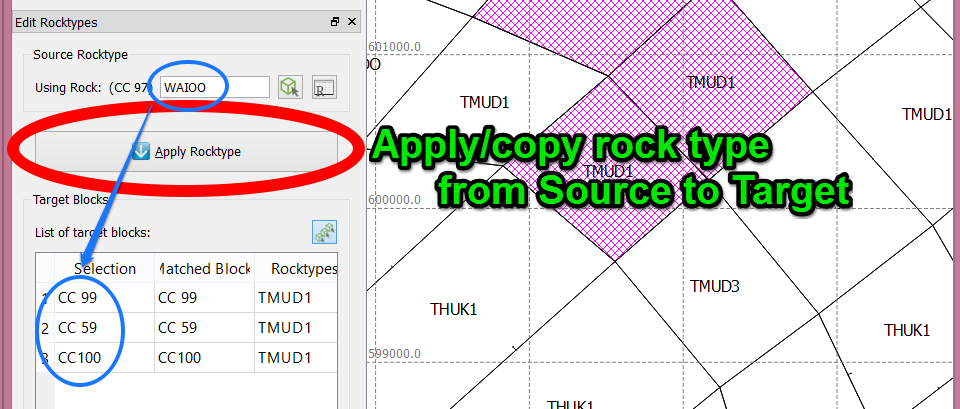
Click "Apply Rocktype" to complete the copy.
A couple tips here:
-
Selection can be across multiple scenes, eg. edit rocks in blocks from three different layers.
-
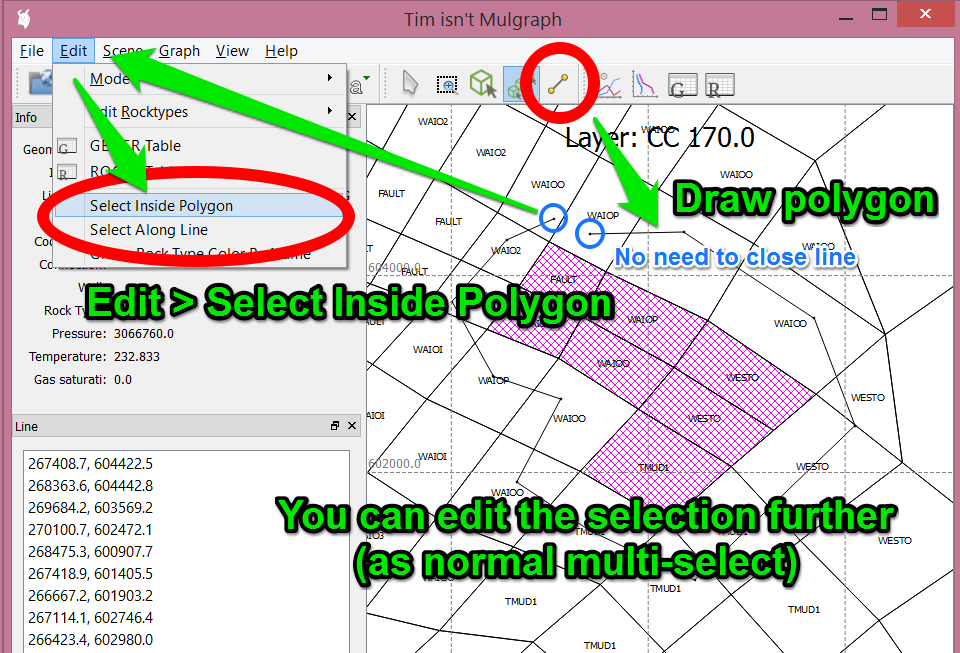
Note how the single/source select is marked by green grid pattern, and multiple/target select are marked by magenta pattern.
-
Source rocktype can also be selected from the Rocktype Table, instead of from a source block.
Advanced selection
There are several ways of selecting blocks, you don't need to click them all one by one.
-
Select inside polygon: Draw a polygon with the same tool as slice line drawing. The polygon does not need to be strictly closed. Edit > Select Inside Polygon. You can edit the selection by clicking blocks on and off just like normal multi-select.
-
Select along a line: Useful to select blocks along a fault line for example.
-
You can use the same line on other scenes. In the Line Panel > Draw.
TODO: regular expression selection using block or rocktype name.
Compare models
You may have noticed that the line plots update themselves if you update/reload the result file. To compare two model results, you will have to mentally remember what the plots look like then reload a new result file.
The 'Save Series' button in the plot windows (near the Data Series Lit) will do this for you. It basically creates a static copy of whatever series you selected. And it will stay in the plot. Once you reload the new result file, you can easily compare the updated line with the frozen line.
Note if you want to do the same thing for all plots, it might be easier to use the batch plotting feature instead.
Batch plotting
The mechanism of saving a list of plots can be useful for batch plotting. A separate Python script is available to generate a PDF file from the saved plot list.
... coming soon ...
Using shortcuts keys and customise mapping
The default keys are listed below, the key without specified context works (almost) everywhere in TIM.
As an example, try holding the Ctrl key down while pressing key 1, denoted in the table as Ctrl+1. This will bring you directly to the color variable selector. You can then hit S key which will bring you to the first item in the dropdown list starts with 's', usually 'Surf' which means surface elevation of your grid.
| Key | Action | Context | |
|---|---|---|---|
Ctrl+O |
Open Geometry File | ||
Ctrl+D |
Open T2 Input File | ||
Ctrl+L |
Open T2 Output File | ||
Ctrl+S |
Save T2 Input File | ||
Ctrl+I |
Start Interactive COnsole | ||
Ctrl+[ |
Reduce Text Size | ||
Ctrl+] |
Increase Text Size | ||
Ctrl+Shift+[ |
Reduce Well Name Size | ||
Ctrl+Shift+] |
Increase Well Name Size | ||
Ctrl+Q |
Focus on Main View | ||
Escape |
Focus on Main View | ||
Ctrl+` |
Focus on Scene List | ||
Ctrl+1 |
Focus on Color Variable List | ||
Ctrl+2 |
Focus on Text Variable List | ||
Ctrl+3 |
Focus on Arrow Variable List | ||
Ctrl+F |
Find Block or Well | ||
Ctrl++ |
Zoom In | ||
Ctrl+= |
Zoom In | ||
Ctrl+- |
Zoom Out | ||
Ctrl+Backspace |
Reset Scene Scale | ||
Ctrl+J |
Next Plot in List | Within line plot panel | |
Ctrl+K |
Previous Plot in List | Within line plot panel |
The default shortcut keys are loosely based on common keys in various applications, and these are user customisable. When TIM is launched, it will check and import if there is a file named keymap.json in the users' settings directory. The file should be in the JSON file format. It is expected to be a list of objects, each have a key and command, for example:
[
    {"key": "Ctrl+,", "command": "block_text_smaller"},
    {"key": "Ctrl+.", "command": "block_text_larger"},
    {"key": "Ctrl+J", "command": "nextPlot", "widget": "plot_board"}
]
Settings directory
... coming soon ...
Writing custom commands
There are situations where TIM's builtin features are not enough for your workflow. One possible solution is to create a 'plugin' yourself. I tried to make this reasonably easy.
... coming soon ...
It's not so bad, is it? In fact, there are a number of features were built internally using this mechanism. The module main_commands.py contains many command classes, and is a good place to learn about creating one.
Adding custom variables
... coming soon ...